Showing posts with label Tutorial. Show all posts

Faves & Finds Linky Party 4!

So my favorite thing that I came across was this  Washi-tape Pencil Cup from A Creative Cookie!

via


I love how easy it is to make and I love that she changed the direction of the tape on each side. It's perfect for someone like me who gets tired of things too quickly, just twist around and its like a whole new style!

So that's my fave of the week and best believe, I will be heading over to Target to pick up some wash tape to make some goodies of my own!


 Now its time to link up!!!

1. Make sure to try and follow Heavenly Blossoms via GFC, Hellocotton, or Bloglovin'!!! Can't miss out on future opportunities to link up right!?

2. Link up to a blog post, this makes it much easier to find your fave/find of the week! (Please no giveaways, shops, etc.)

3. Be sure to check out the other links! I have met some amazingly great people through linky parties. This one will be no exception!

4. Make sure to grab a button for your blog!


Heavenly Blossoms Faves & Finds Linky Party


Guest Post!!! Summer from Made by Munchie's Mama!!

Hey everyone!!! I want to introduce you to my latest Guest Post lovely today!!! She is a wonderful person, with a beautiful family and she is an amazing mama!! Did I also mention she's a boatload of talent and a busy bee? This girl is all over the social media networks and she has an AWESOME blog conference coming up in JUNE!!! I myself would have been right in the first row for that but the Army just happened to call me to California for the month of June! (SO CLOSE YET SO FAR AHHH!!!)

Anyhow, without further ado, here she is to share with you all!


~~~~~~~~~~~~~~~~~~~~~~~~~~~~~


My name is Summer and I am the all over the place mama behind Made By Munchie's Mama.
I work, I wife, I mama and occasionally I am just Summer. I have 2
little boys: Munchie who is 2 aka Gavin and Dylie Bear who is 7 months
aka Dylan.  


My
hubby and I are just like every other couple: struggling to find the
work, parent, spouse balance and taking things one day at a time.  On
my blog you will find me writing about
fights I have with my hubby, mama guilt, what I wear on Wednesdays, and stuff they don't tell you about parenthood before you get pregnant.  I also throw a good ole' tutorial around every now and then.


 And speaking of tutorials, here is a quick little project that I wanted to share with you all today.


Here is my tutorial on how to make a cute little trim dispenser from an empty formula canister...hope you enjoy!

 Supplies: clean formula canister {you could also use one of those planter nut mix canisters if you don't have any formula drinkers at your casa}, scrapbook paper, sponge brush and Mod Podge

 I measured my canisters and their lids and cut out rectangles to go around the outsides and circles to cover the lids.  I also designed a cute little label so I knew what was inside.  Then I cut a little slit in the lid for the lace to come out of...I was going to put 2 kinds in the one on the left, that's why there are 2 holes. You only need 1 hole.

 Apply a thick coat of Mod Podge on the entire canister and on the lid and put a thin layer on the paper back.  Lay the paper down and smooth out any air pockets with your hands.  

Then apply 1 more coat over the paper to make sure it sticks on there really well.  It also gives it a nice little shine.  When it's dry take an craft knife of scissors to cut a slit in the paper for your lace to come out of.

 The canister measured more than 12 inches around and the Silhouette only cuts to 12 inches so I just stuck a scrap piece of paper underneath to cover the exposed part.  I actually think it looks super cute like that.
 And there you have it!  A fun and easy project that will make your craft closet a little brighter and more organized!


PhotobucketBLOG * FACEBOOK * SHOP * TWITTER


Save Money and DIY: Boppy Pillow Cover Tutorial

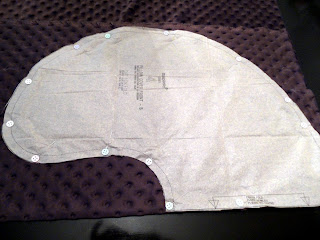
So I felt like I needed to redeem myself for the last one. Here is my second go-round with a fresh new boppy cover.  I have had the pleasure of making another boppy cover for a friend with a brand new baby boy!

You have to admit, free is nice when purchasing a boppy cover can set you back about 30 bucks! Even when I make them for myself, if I take into account the cost  of materials, I save myself money!

Lay out pattern onto your fabric!


Pin down to the fabric.  I like to pin further into the pattern so I don't crash into them with my scissors!


Slip the pattern on the contrasting fabric!

This step is optional!! I like to get an idea of the curves so i pin then clip, then just wing it while I sew, my skills with piping aren't that great yet, although I have seen MUCH improvement.


Ahh yes...and this is what happens when you make a boo boo!


So I ran out of piping, and lo and behold for this project I ran out of the color I needed! But aside from that fact it is well hidden now and barely noticeable ;)

And believe me, I have learned my lesson!!! ALWAYS BUY EXTRA!!!
So some may choose the method of folding the piping into the seam, my preferred method is to go without that lump from the two ends crossing.
So in the picture above I measure about half an inch into each end. The light brown will be going into the dark brown piping.


So with my snips, I clip the seam of the dark brown piping at just about the 
point I marked off for it.


Open up the seam, and expose the rope inside.
Next step is to cute the white rope at the point you marked your piping. Then take
the end of the fabric and fold it down to make the edge neater.


Here you will set the light brown end into the dark brown seam,
so that the white ropes from both ends are flush with each other.


Pin, 

Sew,
and repeat for the other side.


Not so bad eh?


Posted by Picasa

Let's Make Puerto Rican Food: Tembleque Tutorial

Dessert....mmmmmmmm

Coconutty goodness!

So after a yummy Dinner....


Desert should come rather easy!

(OK so I spelled it both ways and I FORGOT how to spell it! lol Ever obsess look at a word too long and it starts to look completely foreign? LOL well thats what happened here!)


It's time to gather the ingredients!


Ingredients needed (recipe borrowed from food.com):

  • 7 ounces cream of coconut (approx 1/2 can)
  • 2 1/2 cups milk ( I replaced this with coconut milk, and in the future it would be wise to do half and half)
  • 1/2 cup cornstarch (This may be too much, so I adjusted it for less cornstarch so it would be more TREMBLY)
  • 4 tablespoons sugar (or to taste)
  • 1 teaspoon vanilla


GROUND cinnamon and Shredded Coconut to top!
Mix all the ingredients in a medium to large saucepan except for toppings and stir VERY WELL.

This is what it should look like after mixing well, ignore the slotted spoon, a whisk works best!


Turn on stove to medium to high heat and NEVER. STOP. STIRRING.


It will start to thicken, it will also bubble but if you are stirring constantly you may never notice.
Continue for ONLY another ONE minute!


This is where you want it, nice and goopy! :) 


Fill your cups!


Sprinkle your favorite topping!


Let it cool a bit, then wrap in cling wrap and refrigerate overnight!


Or save a nice warm one for yourself, and sleep like a baby!

mmmmmmm
 let me know how your versions turn out or if you have any recommendations to the recipes! I would love to try them out!
Posted by Picasa


This post is linked up here!
The DIY Dreamer

Let's Make Puerto Rican Food: Arroz con Habichuelas (Rice and Beans) Tutorial

Bear with me guys, I am making
MY version of....
ARROZ CON HABICHUELAS!
aka
RICE with BEANS!


WITH RIBS ON THE SIDE!

I am no Daisy Martinez, nor am I my own mother, but I have to say its pretty darn YUMMY.

Its the way I like it, flavor texture, and then some!


It's always easier to take all the ingredients you need at the same time! (mise en place)
Thanks Rachael Ray!
(Pictured above: Adobo - without pepper, Sofrito, Apple Cider Vingar, EVOO, chopped garlic and country style ribs!)

In a small bowl or container, mix about one tablespoon each of the garlic, sofrito and about three tablespoons of EVOO. Add a splash of Apple Cider Vinegar to that. and just enough adobo so that you can smell it!

Just like Bob Marley says, "STIR IT UP!"

and throw it in the ziploc with the rib(s) and leave in the fridge to marinate for AT LEAST a half hour!
After marinating, set your oven to 350. Place the ribs on a foiled pan (easy clean-up) and slide those babies in for about 1 and a half hour or until nicely browned!This all depends on how much you put in the oven! Follow usual guidelines!!! I'm just telling you what works for me :)

Ok here I put the oil in and I eyeball it so I already know how much I need.

HOWEVER
 for those first-timers out there, what you are shooting for is glossy rice! Yes, when you first put the rice into the oil there should be enough oil so that not a single dry grain is found!!! This is a little more tricky when the rice is the last ingredient to go in.

SOOOO
with that said, I suggest you practice making white rice first to get better acquainted! Now that I think about it I will make that a blog post for you all!
The above picture is for 2 cups of rice!

 Ingredients for the rice and beans are as follows: 
  • Goya Sazon (1 packet some use less some use more depending on how much rice is made (again I had 2-3 cups).
  • one 8oz can of tomato sauce,
  • adobo to sprinkle in some sabor (flavor),
  • some cumin (a dash or two),
  • two bay leaves,
  • some salt(leave for later)
  • some manzanilla olives (pitted olives with pimiento inside chillin in some brine!)
  • One can of pink kidney beans!
  • I USE: Canilla Long Grain white rice (2 cups in this recipe)


when the oil warms up throw in a tsp and a half of sofrito and garlic!

add the sazon

add the sazon, tomate sauce, beans and one can of water, THEN add enough HOT water for the two finger test....
1.add water
2. stir to settle the rice
3. dip handle of wooden spoon straight into the water STOPPING AS SOON as you touch rice! (DO NOT GO THROUGH THE RICE) then..
4. pull it out and match the water level to two fingers (index and middle side by side) (kinda like an oil check)
5. adjust water accordingly (its always better to add too little than too much!)
This little trick ensures that your rice is the perfect texture every time (not too mushy, not to hard) I like it on the mushier side so I tend to add a BIT more water.

stir baby stir
and add the olives (optional)

Bring up to a boil, leave uncovered, do ONE taste test for seasoning and salt.
 Dont add too much salt because when the water evaporates it may be too salty!

Its hard to tell between these two pictures but when the water evaporates you will see these little funnels where the bubbles come out and when the water level is flush with the rice it is time for the next step!

Take a large metal spoon and turn the rice (kinda like what bakers call folding)
once bottom is top and top is bottom, put the flame to low, cover and wait about 20-25 minutes and check

there should be NO liquid and the rice should be nice and tender!!
Buen Provecho! (Enjoy your meal!)


I shared this recipe here!