Showing posts with label Cooking. Show all posts

Guest Post: Aimee from Like Mother Like Daughter!

Today's Tuesday, so that means I have another amazing (and dare I say mouth watering) guest post for you all today!!!
I am a TRUE FAN of this fine pair of ladies!! They are always sharing the yummiest and not so common meals to help you get out of your meal plan rut!! Today is NO exception.  If you are in the need of trying something new this post here is the best starting point!! Don't forget to stop by her blog and check out all the other goodies too!!!

~~~~~~~~~~~~~~~~~~~~~~~~~~~~~~~~~~~


Hey everyone! And thanks to Jennifer for having me visit today. I'm Aimee and I blog over at Like Mother Like Daughter. Its a blog where my mother and I share our favorite recipes and also talk a little about our lives. I'm so excited to be visiting you all today!

About a year and a half ago I made a goal that I would try at least one new recipe every week. My husband and I had gotten in the routine of having spaghetti, tacos, and hamburgers way too often, so I knew this was a great goal for me to branch out. I've kept with my goal, and its now something that I want to continue for the rest of my life, as we've been able to try a great variety of types of foods, and even found some new family favorites.

Thanks to Pinterest I've been able to find a lot of yummy recipes, and I love it as I way to store the recipes I want to make too. Well a few months back I found this amazing recipe on pinterest, and after trying it decided that it was definitely a new favorite. So, here is my recipe for Baked Southwestern Rolls.


Baked Southwestern Rolls
2 chicken breasts (or about 1 lb pre-shredded chicken)
1 (10 oz) can corn, drained
1 (10 oz) can black beans, drained and rinsed
1 cup spinach, chopped
1 (7oz) can diced green chilies
4 green onions, chopped
1/2 red pepper, chopped
1 TBS cumin
1/2 TBS chili powder
1 TBS salt
1/2 TBS pepper
1/2 tsp cayenne pepper
1 package egg rolls

1. Boil chicken until thoroughly cooked
2. Preheat oven to 425 degrees
3. Shred chicken with 2 forks
4. Combine all ingredients in a large mixing bowl. Mix well.
6. Lay an egg roll wrapper out with a corner facing you.
7. Place about 1/4 cup of the filling in the middle lower half.
8. Take the 2 outward points and fold them in.
9. Take the tip closest to you and roll over the mixture until mixture is covered.
10. Dip your finger in water (or beaten egg) and wipe over the free corner of the egg roll.
11. Press to seal closed.
12. Repeat with the remaining egg rolls.
13. Grease a baking sheet with cooking spray.
14. Place the egg rolls on the pan seam side down.
15. Bake for 15 minutes, flipping halfway through baking.
16. Serve with salsa, guacamole and sour cream.
Thanks again Jennifer for having me over here. And I hope you all let me know if you have any questions regarding this recipe, or need any recipe ideas to get out of the same grind we were once in. And be sure to visit us over here :)
Photobucket

March Photo Challenge Day 7 and Easy Peezy Red Potatoes!!

Day 7: Something you wore:

My Old Navy flip flops!!
I love these, they are so comfy, as beat up as they look I will never let them go (unless they break of course) They come with me everywhere, they are my shower shoes, they are my beach shoes and they coordinate so well with a  pair of boy cut jeans with the cuffs rolled up and a white tee! I even have accessories to match! lol 


So tonight I made some mini meatloaf for the daughter and I! But I was wondering what to pair it with.  I needed it to be quick and easy. And I wanted it to be done around the same time as the meatloaf so that the little one can have her dinner.


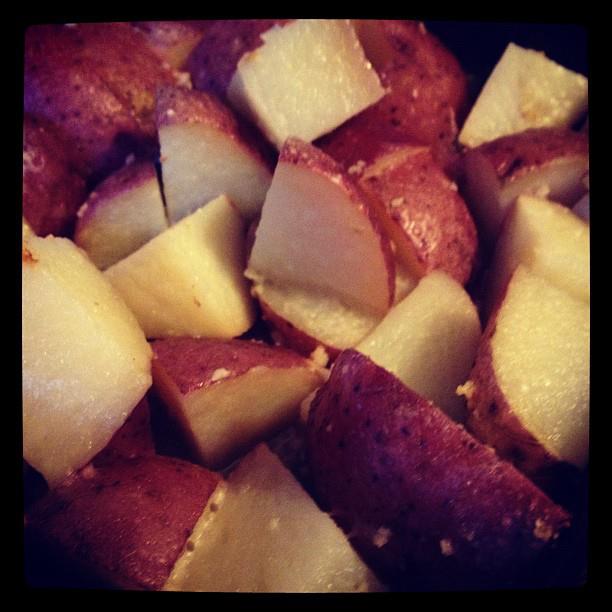
So why not meat and POTATOES!! :) I had about five red potatoes left so I cut them into quarters and laid them out in an 8X8 baking pan.

In a pyrex measuring cup I melted 1/4 cup of margarine, and in that I mixed the juice of half a lemon, a 1/2 tbs of garlic ( I like a lot of garlic), 1tsp of salt. Then I poured that mixture over the potatoes, then mixing it to cover it nice and evenly. Before I popped the pan into the oven I sprinkled a generous amount of parmesan over them and covered with foil. The oven was set to 375° since I was already baking the meatloaf. So I shoved the pan on a rack underneath the meatloaf and set the timer for 30 minutes. 

After the timer's up remove the foil and let bake for about 5 minutes more or until they get golden. And voila!

We have a side dish!
It was sooo yummy...Garlic...mmmmm and the cheese was really a nice touch since there was parmesan mixed into the ground turkey meatloaf! 


I'd like to add this meal to another Mommy made - baby approved meal!!! YAY ME!!!

As for the meatloaf sauce I just used a 1/4 cup of Ketchup mixed with 2 tbs of Worcester Sauce!


If you try it out let me know! Especially if you put a different spin on it!

What I Cooked for Dinner: From Rachael Ray's Look+Cook

So, I had one of those I need to try something different moments.  I was falling into a rut of Rice & Beans, Salmon and Brown Rice for dinner every day.  I have this book that I found in Sam's Club over a year ago, and I figured it was time to try another recipe!


So I picked out the recipe: 
Bocconcini Stuffed Meatballs with Tomato-Pesto Sauce! 

Sounds delicious already right? That's exactly what I thought when I saw it, and read the recipe I thought that it wasn't too easy yet not impossible! The great thing I like about this book in particular is that the recipe and instructions are on one page, and the spread of pictures showing certain steps an the final product are on the same open spread. Which is great in mid-recipe when you need to double check something there is no reason for tomato-sauce fingerprints on the pages!

So with my dinner plan in mind I made my way over to Wegmans to grab up ingredients I didn't have!
(All excuses are great excuses for Wegmans! Especially when it involves the Olive Bar!)

Here is a gratuitous shot of the ingredients ready to go!!!


So, first thing is to soak stale bread in milk, so that you can later squeeze out the milk and crumble it into the meat mixture.


Which is this, the meat is a veal, beef and pork mixture, egg, flat-leaf parsley, minced garlic, grated Parmesan-Reggiano, and salt and pepper.


Make sure that there are no big clumps of bread, and mix to combine the ingredients well.


So as per the directions, I took a handful of meat, and flattened it, then took the Bocconcini which are pretty big, and nestled it right into the meatball. This is the part that counts, make sure to not leave a seam of ground meat as it will definitely break open an the cheese will melt right out! So make sure its closed up well and roll it between you hands to make sure its nice, round, and even.


Now I must say, these meatballs come out REALLY big.  But in the book its basically the only thing you eat. It isn't paired with pasta. But you certainly can if you want to!


Before popping them in the oven,  I brushed some EVOO onto the meatballs so that they can brown nicely in the oven. (Which was preheated to 425ยบ)


While the meatballs were cooking I started working on the Tomato-Pesto Sauce, I had a can of San Marzano Plum tomatoes, peeled and whole. I put them into a smallish frying pan and mashed the tomatoes.  I then added salt and pepper, to taste. 


This is what it starts to look like after stirring often and cooking on medium-high heat, it will even start to thicken up a little.


The Pesto was Basil, Parsley, minced garlic, lemon zest, chicken stock and S&P.  About of 1/4 cup of EVOO was to be added while processor was going to make it into a thick paste. This step was a bit of a flop for me. Because I have a mini Cuisinart Proccessor which you have open to add anything, so of course, I added too much Olive Oil and the paste just wasn't happening. Next time I will be more patient.


Right around that time, the meatballs were ready! Don't they look DELISH!?
(In the back you can see some of the mozza pouring out from one of the meatballs. Not the most ideal situation but then again, I don't mind the baked cheese at all!)


Here it is....now I'm just going to say this now...I am obviously not a professional food photographer and I am nowhere near skilled in the food presentation department, but.....this is the meal...The Tomato-Pesto which turned out REALLY tasty (and as easy as it was to make, I wonder if I'll buy jarred sauce ever again)
I topped it with the meatballs and then sprinkled some more grated Parmesan-Reggiano over it.

Now the meal as a whole was SOOO yummy...the garlic, herbs and cheese was such a good blend...and the sauce was a great addition.  


Now the recipe makes 16 meatballs stating that it serves 4, but in the end only twelve fit the rimmed baking sheet and two meatballs were more than enough for me! They are still quite large after cooked.  Its definitely yummy alone, but it can be easily tweaked to a meatball parm style open sandwich meal, or you can add a chunky pasta like bow-tie.  Either way, it's pretty easy to make, its totally customizable and get this....

My daughter devoured it!!

How's that for kid-approved!?!? :)


So dinner was a success and this one will definitely be a regular...treat!!! I will be running the calories off of this one today!

Hope you all get a chance to try and if you have any questions at all, feel free to email me or leave a comment below! :)


~~~~~~~~~~~~~~~~~~~~~~~~~~~~~~~~~~~~~~~~


Speaking of treat, have you entered in Made by Munchie's Mama's Giveaway yet?
 I am one of her February Sponsors and I'm giving away a $25 credit to my Etsy shop!
Head on over right now! Giveaway is on until Sunday!


Oh and here's a little sugar on top!! FREE SHIPPING on any purchase in my shop!!!
Enter code:
SHIPFREE2ME


Let's Make Puerto Rican Food: Tembleque Tutorial

Dessert....mmmmmmmm

Coconutty goodness!

So after a yummy Dinner....


Desert should come rather easy!

(OK so I spelled it both ways and I FORGOT how to spell it! lol Ever obsess look at a word too long and it starts to look completely foreign? LOL well thats what happened here!)


It's time to gather the ingredients!


Ingredients needed (recipe borrowed from food.com):

  • 7 ounces cream of coconut (approx 1/2 can)
  • 2 1/2 cups milk ( I replaced this with coconut milk, and in the future it would be wise to do half and half)
  • 1/2 cup cornstarch (This may be too much, so I adjusted it for less cornstarch so it would be more TREMBLY)
  • 4 tablespoons sugar (or to taste)
  • 1 teaspoon vanilla


GROUND cinnamon and Shredded Coconut to top!
Mix all the ingredients in a medium to large saucepan except for toppings and stir VERY WELL.

This is what it should look like after mixing well, ignore the slotted spoon, a whisk works best!


Turn on stove to medium to high heat and NEVER. STOP. STIRRING.


It will start to thicken, it will also bubble but if you are stirring constantly you may never notice.
Continue for ONLY another ONE minute!


This is where you want it, nice and goopy! :) 


Fill your cups!


Sprinkle your favorite topping!


Let it cool a bit, then wrap in cling wrap and refrigerate overnight!


Or save a nice warm one for yourself, and sleep like a baby!

mmmmmmm
 let me know how your versions turn out or if you have any recommendations to the recipes! I would love to try them out!
Posted by Picasa


This post is linked up here!
The DIY Dreamer

Let's Make Puerto Rican Food: Arroz con Habichuelas (Rice and Beans) Tutorial

Bear with me guys, I am making
MY version of....
ARROZ CON HABICHUELAS!
aka
RICE with BEANS!


WITH RIBS ON THE SIDE!

I am no Daisy Martinez, nor am I my own mother, but I have to say its pretty darn YUMMY.

Its the way I like it, flavor texture, and then some!


It's always easier to take all the ingredients you need at the same time! (mise en place)
Thanks Rachael Ray!
(Pictured above: Adobo - without pepper, Sofrito, Apple Cider Vingar, EVOO, chopped garlic and country style ribs!)

In a small bowl or container, mix about one tablespoon each of the garlic, sofrito and about three tablespoons of EVOO. Add a splash of Apple Cider Vinegar to that. and just enough adobo so that you can smell it!

Just like Bob Marley says, "STIR IT UP!"

and throw it in the ziploc with the rib(s) and leave in the fridge to marinate for AT LEAST a half hour!
After marinating, set your oven to 350. Place the ribs on a foiled pan (easy clean-up) and slide those babies in for about 1 and a half hour or until nicely browned!This all depends on how much you put in the oven! Follow usual guidelines!!! I'm just telling you what works for me :)

Ok here I put the oil in and I eyeball it so I already know how much I need.

HOWEVER
 for those first-timers out there, what you are shooting for is glossy rice! Yes, when you first put the rice into the oil there should be enough oil so that not a single dry grain is found!!! This is a little more tricky when the rice is the last ingredient to go in.

SOOOO
with that said, I suggest you practice making white rice first to get better acquainted! Now that I think about it I will make that a blog post for you all!
The above picture is for 2 cups of rice!

 Ingredients for the rice and beans are as follows: 
  • Goya Sazon (1 packet some use less some use more depending on how much rice is made (again I had 2-3 cups).
  • one 8oz can of tomato sauce,
  • adobo to sprinkle in some sabor (flavor),
  • some cumin (a dash or two),
  • two bay leaves,
  • some salt(leave for later)
  • some manzanilla olives (pitted olives with pimiento inside chillin in some brine!)
  • One can of pink kidney beans!
  • I USE: Canilla Long Grain white rice (2 cups in this recipe)


when the oil warms up throw in a tsp and a half of sofrito and garlic!

add the sazon

add the sazon, tomate sauce, beans and one can of water, THEN add enough HOT water for the two finger test....
1.add water
2. stir to settle the rice
3. dip handle of wooden spoon straight into the water STOPPING AS SOON as you touch rice! (DO NOT GO THROUGH THE RICE) then..
4. pull it out and match the water level to two fingers (index and middle side by side) (kinda like an oil check)
5. adjust water accordingly (its always better to add too little than too much!)
This little trick ensures that your rice is the perfect texture every time (not too mushy, not to hard) I like it on the mushier side so I tend to add a BIT more water.

stir baby stir
and add the olives (optional)

Bring up to a boil, leave uncovered, do ONE taste test for seasoning and salt.
 Dont add too much salt because when the water evaporates it may be too salty!

Its hard to tell between these two pictures but when the water evaporates you will see these little funnels where the bubbles come out and when the water level is flush with the rice it is time for the next step!

Take a large metal spoon and turn the rice (kinda like what bakers call folding)
once bottom is top and top is bottom, put the flame to low, cover and wait about 20-25 minutes and check

there should be NO liquid and the rice should be nice and tender!!
Buen Provecho! (Enjoy your meal!)


I shared this recipe here!

Step-by-Step Attempt of Tyler Florence's Chicken and Dumplings

Hey guys!! WOW, not one but TWO blog posts in ONE day! Thank you Blue Cricket Design for inspiring me and helping me realize that its NOT that hard lol (in a good way :))

So with that said, I can finally share my successful attempt at Tyler Florence's Recipe Tyler's Ultimate Chicken and Dumplings recipe. Boy was it scrumptious! I am so glad I documented the process that went into making this so that I can better share the steps along the way!

ENJOY and I hope that if you do try this, please let me know how it went I would love to hear about your creative twists on this wonderful comfort food!

Gather your ingredients :)

Chicken and Stock:
  • 1 (3 to 31/2 pound) whole organic chicken
  • 2 bay leaves
  • 6 sprigs thyme
  • 4 to 5 black peppercorns
  • 1 head garlic, split through the equator
  • 2 tablespoons salt


I'm ready for my closeup!

Place the chicken and all stock ingredients in a large Dutch oven and cover with water. Set over medium-high heat and bring to a boil. Reduce heat to a simmer and cook for 1 hour until the chicken is tender. Skim the surface of fat and scum (ew) as it cooks.
To prepare the Dumplings:
Buttermilk-Chive Dumplings:
  • 2 cups all-purpose flour
  • 1 tablespoon bakingshowlist_icon.gif powder
  • 1 teaspoon salt
  • 2 eggs
  • 1/4 cup chopped chives
  • 3/4 to 1 cup buttermilk


Sift the dry ingredients together in a large bowl. In a small bowl, using a whisk, lightly beat the eggs, chives and buttermilk together; pour the liquid ingredients into the dry ingredients and gently fold. Mix just until the dough comes together; the batter should be thick and cake-like.


To prepare sauce: In a Dutch oven, over medium heat, add the butter and oil. Add the carrot, celery, garlic, and bay leaves and saute until the vegetables are soft, about 5 minutes. Stir in the flour to make a roux. Continue to stir and cook for 2 minutes to coat the flour and remove the starchy taste. Slowly pour in the chicken stock, 1 cup at a time, stirring well after each addition. Add frozen peas and pearl onions.
Let sauce simmer until it is thick enough to coat the back of a spoon, about 15 minutes. Stir in heavy cream.


Fold the reserved shredded chicken into the sauce and bring up to a simmer. Using 2 spoons, carefully drop heaping tablespoonfuls of the dumpling batter into the hot mixture. The dumplings should cover the top of the sauce, but should not be touching or crowded. Let the dumplings poach for 10 to 15 minutes until they are firm and puffy. Remove and discard the bay leaves. Season with freshly cracked black pepper and garnish with chopped chives before serving.


And there you have it!!!

Here I thought, "Man, Tyler Florence is AWESOME at what he does, it will be impossible for an amateur like me to do it." 
WRONG!!!! If you watch his show he simplifies it nicely!!! When it comes time to actually doing the recipe, as long as everything is mise en place, YOU WILL BE FINE and it will turn out quite good!!

So here HIS recipe, just in case I may have accidentally left anything out above!! I am SO glad I can share this with you guys. As you can see by the timestamp I am a major procrastinator and should have posted this blog eons ago!! Well no fear because now its here!!! :)

ENJOY!!!!!

Show and Tell Green